Tuesday, January 24, 2023

OLVM Gluster data domain healing - (Addressing split brain)


In recent years, the tremendous growth of applications, and these applications started generating huge volumes of data be it from mobile devices or be it from the web. As more and more such applications are being built, they needed to deliver the content directly to the user at a faster rate irrespective of if they are using a Mobile, Tablet, Laptop, Desktop, or any such device.  Along with this, handling a larger volume of files became a challenge, needs a lot of Metadata related to the file needs to be stored and accessed when needed. Data storage once looked very easy, became a big challenge now.

Storage technologies are rapidly changing in the last 3 decades, Current trend is towards software-driven data center technologies. Now we have software-driven cluster files systems such as Gluster, which gives you more elasticity and scalability. 

In the clustered environment there is a possibility you will face this split-brain scenario. In simple terms, split-brain occurs when two nodes of a cluster are disconnected. Each node thinks the other one is not working.

Let's understand what is split-brain.

What is Split-Brain?

As mentioned in the Official Documentation on Managing Split-Brain provided by RedHat, split-brain is a state when data or availability inconsistencies originating from the maintenance of two separate data sets with an overlap in scope, either because of servers in a network design or a failure condition based on servers not communicating and synchronizing their data to each other. And it is a term applicable to replicate the configuration.

Pay attention that it is said "a failure condition based on servers not communicating and synchronizing their data to each other" - due to any likelihood - but it doesn't mean that your nodes might lose the connection. The Peer may be yet in the cluster and connected.

Summarized : 

  • The difference in file data/metadata across the bricks of a replica.
  • Cannot identify which brick holds the good copy, even when all bricks are available.
  • Each brick accuses the other of needing healing.
  • All modification FOPs fail with input/output Error (EIO)
 
Split-Brain Types :

We have three different types of split-brain, and as far as I can see yours is entry split-brain. To explain three types of split-brain :

  • Data split-brain: Contents of the file under split-brain are different in different replica pairs and automatic healing is not possible.
  • Metadata split-brain:, The metadata of the files (for example, user-defined extended attribute) are different and automatic healing is not possible.

  • Entry split-brain: It happens when a file has a different GFID on each replica pair.


What is GFID?

GlusterFS internal file identifier (GFID) is a UUID that is unique to each file across the entire cluster. This is analogous to the inode number in a normal filesystem. The GFID of a file is stored in its xattr named trusted.gfid. To find the path from GFID, I highly recommend you read this official article provided by GlusterFS.

In this article, I will cover the steps of how we can come out of the GFS split-brain condition. 

How glusterfs data domain entered to split-brain condition?


I faced a split-brain scenario in the glusterfs data domain configured in OLVM. This occurred due to unexpected network latency triggered by the KVM management network. At this time we are reading the data from NFS share and writing to GFS storage. RMAN restores are storage intensive and GFS configured as replicated volume transferring data from one block to another. Due to network latency suddenly replication got stopped and the GFS file system went into a split-brain condition.


How to identify the files in a split-brain condition 

To check whether the GFS files are in split-brain or not execute gluster volume heal gvol0 info split-brain. As per this below mention output, the command will display the files that are in split-brain condition.

During this time period, both storage domains went offline, because the storage master node got affected due by this network latency.


[root@KVM01 dom_md]# gluster volume heal gvol0 info split-brain
Brick KVM01:/nodirectwritedata/glusterfs/brick1/gvol0
/22a3d534-86b2-4f63-aa44-9ac555404692/images/6639bd7e-33b1-42a5-89b0-0eee2b3a7262/e9981ace-c0c0-4bc6-9e6d-e03a805f083a  
/22a3d534-86b2-4f63-aa44-9ac555404692/dom_md/ids                                                                             
/22a3d534-86b2-4f63-aa44-9ac555404692/images/bdea3934-edce-494b-91cf-06fb536a9f9c/c04307ed-e8dc-459d-8bd5-02446b2b9175
/22a3d534-86b2-4f63-aa44-9ac555404692/images/a9b5b747-2fae-4b32-b839-2ea03dfcf35e/cb1b3014-1fbd-44d6-854c-fe55dc22f4a3
/22a3d534-86b2-4f63-aa44-9ac555404692/images/d28ab741-0d69-4ad6-97e3-4449b42b782f/10bc2496-ff19-4087-bc55-aab201b39936
/22a3d534-86b2-4f63-aa44-9ac555404692/images/7c25b5da-aabd-49ad-bf4a-f458f382e525/a44a71d7-98d4-47cd-aeae-f8fe5ac4bf1e
/22a3d534-86b2-4f63-aa44-9ac555404692/images/d7882784-cf18-4c8c-af22-f46fe3a96c8e/4fa5c17b-2739-46a7-8c20-3e943cc764b5
/22a3d534-86b2-4f63-aa44-9ac555404692/images/05caeb56-9287-484b-aef0-8f389d27f1bf/d370a0d8-889d-488d-bcaa-4ac652f7c5fe
/22a3d534-86b2-4f63-aa44-9ac555404692/dom_md/leases                                                                      
/22a3d534-86b2-4f63-aa44-9ac555404692/dom_md/outbox                                                                     
Status: Connected
Number of entries in split-brain: 10

Recovery Process

There are a few ways to perform the glusterfs split-brain recovery. All the recovery scenarios are there in the glusterfs document:https://docs.gluster.org/en/main/Troubleshooting/resolving-splitbrain/.

This was a rare situation in that we need to pick up the latest modified block as the recovery file. The latest file modified time can be validated via the stat command.

As per the log, brick 2 got the latest modified time stamp. This block can be used to recover the files to get out of the split-brain condition. 


[root@KVM01 dom_md]# stat /nodirectwritedata/glusterfs/brick1/gvol0/22a3d534-86b2-4f63-aa44-9ac555404692/images/a9b5b747-2fae-4b32-b839-2ea03dfcf35e/cb1b3014-1fbd-44d6-854c-fe55dc22f4a3
  File: /nodirectwritedata/glusterfs/brick1/gvol0/22a3d534-86b2-4f63-aa44-9ac555404692/images/a9b5b747-2fae-4b32-b839-2ea03dfcf35e/cb1b3014-1fbd-44d6-854c-fe55dc22f4a3
  Size: 268435456000    Blocks: 524301176  IO Block: 4096   regular file
Device: fc07h/64519d    Inode: 3224096484  Links: 2
Access: (0660/-rw-rw----)  Uid: (   36/    vdsm)   Gid: (   36/     kvm)
Context: system_u:object_r:glusterd_brick_t:s0
Access: 2022-10-13 10:05:08.396792385 -0400
Modify: 2022-10-13 10:05:15.705792522 -0400
Change: 2022-10-14 09:59:16.348788467 -0400
 Birth: 2022-09-22 11:18:48.043805922 -0400
 
 [root@KVM02 log]# stat /nodirectwritedata/glusterfs/brick2/gvol0/22a3d534-86b2-4f63-aa44-9ac555404692/images/a9b5b747-2fae-4b32-b839-2ea03dfcf35e/cb1b3014-1fbd-44d6-854c-fe55dc22f4a3
  File: /nodirectwritedata/glusterfs/brick2/gvol0/22a3d534-86b2-4f63-aa44-9ac555404692/images/a9b5b747-2fae-4b32-b839-2ea03dfcf35e/cb1b3014-1fbd-44d6-854c-fe55dc22f4a3
  Size: 268435456000    Blocks: 524300992  IO Block: 4096   regular file
Device: fc07h/64519d    Inode: 4109        Links: 2
Access: (0660/-rw-rw----)  Uid: (   36/    vdsm)   Gid: (   36/     kvm)
Context: system_u:object_r:glusterd_brick_t:s0
Access: 2022-10-05 15:15:46.368629123 -0400
Modify: 2022-10-13 10:08:08.513029740 -0400
Change: 2022-10-14 10:01:50.679076234 -0400
 Birth: 2022-09-22 11:21:29.195597907 -0400


Healing

While performing the healing you have to make sure the session should be consistent without any interruption. you can use tmux to create a consistent session, hope this cheat sheet will be useful to understand tmux : https://tmuxcheatsheet.com/. Healing time will vary with the size, 500GB vm disk took 4hr to complete the healing.

Validate can be performed via md5sum, both files should have the same hash value.
Healing can be performed by executing under mentioned command.

gluster volume heal --VOLNAME-- split-brain source-brick --HOSTNAME:BRICKNAME-- --FILE--

Sample output of the heal


[root@KVM02 ~]#gluster volume heal gvol0 split-brain source-brick KVM01.local.com:/nodirectwritedata/glusterfs/brick2/gvol0 /22a3d534-86b2-4f63-aa44-9ac555404692/images/a9b5b747-2fae-4b32-b839-2ea03dfcf35e/cb1b3014-1fbd-44d6-854c-fe55dc22f4a3
Healed /22a3d534-86b2-4f63-aa44-9ac555404692/images/a9b5b747-2fae-4b32-b839-2ea03dfcf35e/cb1b3014-1fbd-44d6-854c-fe55dc22f4a3.

Conclusion

There can be situations glusterfs replicate volume can move to an inconsistent state due to managing network traffic. This can be avoided by having 3 blocks for glusterfs volume or the need to enable fencing via OLVM engine.  Next blog I will elaborate on how you can increase the network threshold to 100%. This gives you breathing space to avoid split brain conditions.

Tuesday, January 10, 2023

Azure template creation for DB - Part 2 ( Cloning new VM using snap disks)


Intro


In this era, cloud technology is booming at a rapid pace and businesses are focusing on optimizing IT infrastructure workloads by adopting cloud models like AWS, Azure, GCP, and OCI. Cloud technologies enable the organization to get on-demand services and get the advantage of quick environment provisioning. A few years back organizations were hesitant to move to the cloud due to security concerns. But everything has changed because as all cloud providers have come up with strong protection for data using various encryption technologies.

Whenever you need to build a new database environment for customers, Azure cloud makes this super easy using the snapshot feature. This enables the fast provision of new environments for complex database systems like Oracle. Even this feature can be used as a backup feature for major database changes.

The current oracle image does not consist of Oracle ASM.  In this blog, I will give an insight into how to clone VM using snap disks.

1. VM cloning steps

My Azure template creation for DB - Part 1 blog: https://chanaka-dbhelp.blogspot.com/2022/06/azure-template-creation-for-db.html illustrates the steps to create a snapshot disk with software-only installations.

In this article, I will elaborate on how to clone the new VM using snapshot disks.

To clone the oracle database software installation with grid VM we need two disks.

OS disk - Has all the required RPMs.
Oracle - software-only installation of the binary.

1.1. OS Create disk

In Azure cloud, we need to create a disk using snapshot disks. Search Manage disks in the search bar as per figure 1.


 Figure 1: Search " Manage disks" in the Azure portal.


Using the Manage disks service we can create disks with different sizes and respective naming conventions. Also, this allows you to change the Region and Availability zone.


 Figure 2: Create root disk using the Manage disks feature.


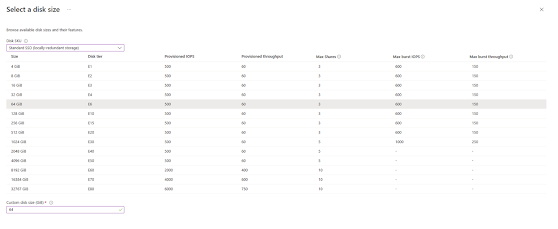
Disk selection allows you to select any disk type and size as per your requirement. As per this example, my previous disk size was 32G, New disk size is 64G.


Figure 3: Selection of the disks


1.2. Create Oracle binary disk.


Now validate the disk status and create the disk.


 Figure 4: OS Disk validation


Repeat the same step to create the oracle binary disk to clone the vm.


Figure 5: Oracle binary disk creation


Figure 5: Oracle binary disk validation.


Once you create the disk make sure to validate the disk from the disk section. As per this example,  there should be two disks.


Figure 6: Validate the created disk.


2. Create a VM using the root disk


To clone the VM you need OS binary disk, Navigate to the disk section and select the OS disk.
Once you select the OS disk you can create a new VM using the selected OS disk.


Figure 7: I have highlighted the selected OS disk and created a VM tab.


As this is a full VM clone add the oracle binary disk, the binary disk has oracle DB and grid software-only installation.


 Figure 8: Select oracle binary disk.


The next step is to validate and complete the VM creation.


3. Validation

Once the VM creation is complete startup the VM from the console.  Now you can change the hostname and work standalone ASM installation.


Conclusion

Cloud providers are coming up with new features periodically. Azure snapshot is a great feature for taking consistent images of VM disks. This feature enables paths for quick environment provisioning. Oracle builds are always time-consuming, and using the snapshot feature can save snapshot images of the database installation with the latest patches for new environment creation.

Thursday, January 5, 2023

OLVM intergration with OEM 13c - (OLVM Monitoring)


Intro

Nowadays businesses heavily depend on online mission-critical databases and applications. The online market is 24X7 so it's important they must be on top of the infrastructure monitoring. This helps system engineers, and database engineers to proactively react to alerts before they become major incidents. Monitoring and alerting play a vital role in enterprise IT  infrastructure. 

Companies are absorbing the oracle virtualization platform to host their databases and applications. It's of paramount importance to get alerts from the virtualization environment. Recently oracle integrate OLVM with oracle 13c OEM, which eases the administration overhead and helps the database administrators to manage infrastructure using the centralized console. Oracle 13c OEM is a well-mature product for monitoring and alerting, Also has many features and flexibility to tune the alerting as per the infrastructure.

In this article, I will cover the steps of how can we integrate OLVM with OEM13c.

You can refer oracle documentation link which has a step to integrate OLVM with 13c: 
https://us.v-cdn.net/6032257/uploads/jive_attachments/0/2/0/02040254ydoByranib.pdf.

Pre-requisites for OLVM integration with OEM13c.

  • Install the agent on the OLVM server.
  • Add Engine certificate to OEM trusted certificate list.
  • Provide the required information for registration.

Registration steps 


As an initial step, make sure to have the oracle virtualization plug-in installed on the management server. If a plug-in exists push the agent to the OLVM server.


Successful registration should show the agent installation with the status green tik.


Once the agent installation is completed,  download the Engine CA certificate from OLVM and copy it to the OEM server.


The next step is to add the key to oem trusted certificate list by executing emctl secure add_trust_cert_to_jks -trust_certs_loc cert-location -alias NAME command.

There is a possibility of occurring an error if the registration password is incorrect. The correct password is there in oracle documentation.

Unsuccessful registration


[oracle@localhost]$ /apps/orasoft/product/agent13c/agent_13.5.0.0.0/bin/emctl secure add_trust_cert_to_jks -trust_certs_loc /apps/orasoft/stage/OLVM-CRT/sofe-olvm-01.crt -alias SOFE-OLVM
Oracle Enterprise Manager Cloud Control 13c Release 5
Copyright (c) 1996, 2021 Oracle Corporation.  All rights reserved.
Password:

Message   :   keytool error: java.io.IOException: Keystore was tampered with, or password was incorrect
ExitStatus: FAILED

Successful Registration


[oracle@localhost]$ /apps/orasoft/product/agent13c/agent_13.5.0.0.0/bin/emctl secure add_trust_cert_to_jks -trust_certs_loc /apps/orasoft/stage/OLVM-CRT/sofe-olvm-01.crt -alias SOFE-OLVM
Oracle Enterprise Manager Cloud Control 13c Release 5
Copyright (c) 1996, 2021 Oracle Corporation.  All rights reserved.
Password:

Message   :   Certificate was added to keystore
ExitStatus: SUCCESS


Navigate to Enterprise > Cloud > Oracle Linux Virtualization Infrastructure.


                         Figure 1: Show how you can navigate to the OLVM console.

Click the registration page and add the required information for registration.

          Figure 2: Navigate to the registration page 

Feed information such as the NAME of the OLVM, select the monitoring agent, engine URL, and the admin password.

Figure 3: Registration page 

Successful registration shows the  Number of clusters,  Datacenter, Servers, and VMs.

Figure 4: OLVM dashboard

This shows details information about the KVM server.


Figure 4: OLVM dashboard

Conclusion 

When organizations host databases and applications on oracle virtualized platforms like Oracle KVM with OLVM we need proper monitoring and alerting. In addition, organizations focus on reducing the administration overhead for monitoring tools. Integration of OEM13c with OLVM enables the path for proper monitoring via a centralized dashboard.

Unified Auditing Housekeeping

  Intro  Data is the new currency. It is one of the most valuable organizational assets, however, if that data is not well...