
Intro
In this era, cloud technology is booming at a rapid pace and businesses are focusing on optimizing IT infrastructure workloads by adopting cloud models like AWS, Azure, GCP, and OCI. Cloud technologies enable the organization to get on-demand services and get the advantage of quick environment provisioning. A few years back organizations were hesitant to move to the cloud due to security concerns. But everything has changed because as all cloud providers have come up with strong protection for data using various encryption technologies.
Whenever you need to build a new database environment for customers, Azure cloud makes this super easy using the snapshot feature. This enables the fast provision of new environments for complex database systems like Oracle. Even this feature can be used as a backup feature for major database changes.
The current oracle image does not consist of Oracle ASM. In this blog, I will give an insight into how to clone VM using snap disks.
In this article, I will elaborate on how to clone the new VM using snapshot disks.
The current oracle image does not consist of Oracle ASM. In this blog, I will give an insight into how to clone VM using snap disks.
1. VM cloning steps
My Azure template creation for DB - Part 1 blog: https://chanaka-dbhelp.blogspot.com/2022/06/azure-template-creation-for-db.html illustrates the steps to create a snapshot disk with software-only installations.In this article, I will elaborate on how to clone the new VM using snapshot disks.
To clone the oracle database software installation with grid VM we need two disks.
OS disk - Has all the required RPMs.
Oracle - software-only installation of the binary.
1.1. OS Create disk
In Azure cloud, we need to create a disk using snapshot disks. Search Manage disks in the search bar as per figure 1.
Figure 1: Search " Manage disks" in the Azure portal.
Using the Manage disks service we can create disks with different sizes and respective naming conventions. Also, this allows you to change the Region and Availability zone.


Figure 2: Create root disk using the Manage disks feature.
Disk selection allows you to select any disk type and size as per your requirement. As per this example, my previous disk size was 32G, New disk size is 64G.
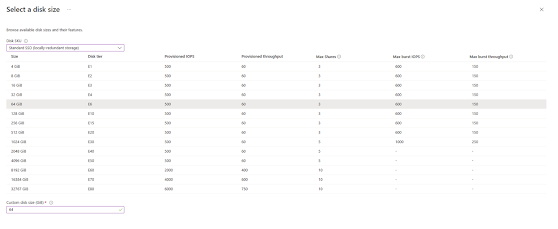
Figure 3: Selection of the disks
1.2. Create Oracle binary disk.
Now validate the disk status and create the disk.

Figure 4: OS Disk validation
Repeat the same step to create the oracle binary disk to clone the vm.


Figure 5: Oracle binary disk creation

Figure 5: Oracle binary disk validation.
Once you create the disk make sure to validate the disk from the disk section. As per this example, there should be two disks.

Figure 6: Validate the created disk.
2. Create a VM using the root disk
To clone the VM you need OS binary disk, Navigate to the disk section and select the OS disk.
Once you select the OS disk you can create a new VM using the selected OS disk.

Figure 7: I have highlighted the selected OS disk and created a VM tab.
As this is a full VM clone add the oracle binary disk, the binary disk has oracle DB and grid software-only installation.

Figure 8: Select oracle binary disk.
The next step is to validate and complete the VM creation.

3. Validation
Once the VM creation is complete startup the VM from the console. Now you can change the hostname and work standalone ASM installation.

Conclusion
Cloud providers are coming up with new features periodically. Azure snapshot is a great feature for taking consistent images of VM disks. This feature enables paths for quick environment provisioning. Oracle builds are always time-consuming, and using the snapshot feature can save snapshot images of the database installation with the latest patches for new environment creation.


No comments:
Post a Comment