Monday, November 14, 2022

Configure Storage domain (OLVM) - Part 4/6


Intro

I hope the last few articles were helpful to start a new journey with OLVM (Oracle Linux Virtual Manager). As we configured the KVM on the OLVM environment the next step is to configure the storage domain. VMs disks and snapshots are stored under storage domains.  

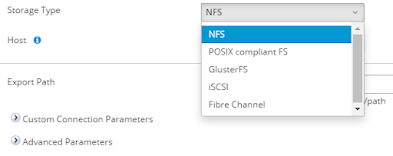
OLVM supports 4 types of storage types.
  1. NFS
  2. POSIX compliant fs
  3. GlusterFS
  4. iSCASI
  5. Fiber Channel


What is the Storage domain?

A storage domain is a collection of images that have a common storage interface. A storage domain contains complete images of templates, virtual machines, virtual machine snapshots, or ISO files. Oracle Linux Virtualization Manager supports storage domains that are block devices (SAN - iSCSI or FCP) or a file system (NAS - NFS or Gluster).

Last few decades SAN technologies have improved drastically.  There are many redundancy mechanisms like mirroring, RAID 5, RAID 6, and RAID 6 +1 to achieve data redundancy.  To achieve 2 layers of data redundancy we can use the distributed file system. GlusterFS is an OLVM support cluster distributed file system. GlusterFS has the feature of creating replicated volumes for distributed databases.

What is GlusterFS? 

GlusterFS is a distributed file system defined to be used in user space, i.e. File System in User Space (FUSE). It is a software-based file system that accounts for its own flexibility feature.

 Figure 1  illustrates schematically represents the position of GlusterFS in a hierarchical model. By default TCP protocol will be used by GlusterFS.


                                                     Figure 1: Gluster FS hierarchical model

I have listed the benefits that come with GlusterFS. 

  • Innovation - It eliminates the metadata and can dramatically improve the performance which will help us to unify data and objects.
  • Elasticity  - Adapted to growth and reduction of the size of the data.
  • Scale Linearly - It has the scalability to petabytes and beyond.
  • Simplicity - It is easy to manage and independent from the kernel while running in user space.
Refer https://www.tecmint.com/introduction-to-glusterfs-file-system-and-installation-on-rhelcentos-and-fedora/ link the get more understanding of the GFS.

In this article, we will focus on configuring the GlusterFS replicated volumes and how to integrate this with OLVM.  For this configuration, we are going to use KVM hosts as the Gluster FS server and the client. Also shared oracle documentation for configuration Glusterfs.

https://docs.oracle.com/en/learn/gluster-oracle-linux/index.html#create-the-trusted-storage-pool


Let's start with installing the GFS server rpms.

Installed required RPMs

We need to install glusterfs server rpm to enable the gluster server services.


## Enable access to the Gluster packages
sudo dnf install oracle-gluster-release-el8 -y
sudo dnf config-manager --enable ol8_gluster_appstream ol8_baseos_latest ol8_appstream

## Install the Gluster server packages.
sudo dnf install @glusterfs/server -y
  

Enable the GFS services

Once the GFS server RPMs installation is complete enable the gluster services and add gfs service to the firewall rule.


sudo systemctl enable --now glusterd
  

Configure the firewall to allow traffic on the ports that are specifically used by Gluster.


sudo firewall-cmd --permanent --add-service=glusterfs
sudo firewall-cmd --reload
  

Configure block device for GFS


We need to create a partition and make XFS file system for GFS bricks. Make sure not to write anything directly on the brick.


$ sudo fdisk /dev/mapper/3624a93701561d6718da94a2000011014
$ sudo mkfs.xfs -f -i size=512 -L glusterfs /dev/mapper/3624a93701561d6718da94a2000011014p1
$ sudo mkdir -p /nodirectwritedata/glusterfs/brick1
$ sudo echo 'LABEL=glusterfs /nodirectwritedata/glusterfs/brick1 xfs defaults 0 0' >> /etc/fstab
$ mount -a
$ sudo mkdir /nodirectwritedata/glusterfs/brick1/gvol0
$ df -H


This is how it looks after adding the disk from the SAN. Make sure disks are not shared among both the KVM servers.


[root@KVM01 ~]# lsblk
NAME                                    MAJ:MIN RM  SIZE RO TYPE  MOUNTPOINT
sda                                       8:0    0 59.6G  0 disk
├─sda1                                    8:1    0    4G  0 part
│ └─md127                                 9:127  0    4G  0 raid1 [SWAP]
├─sda2                                    8:2    0    2G  0 part
│ └─md125                                 9:125  0    2G  0 raid1 /boot/efi
└─sda3                                    8:3    0 53.6G  0 part
  └─md126                                 9:126  0 53.6G  0 raid1 /
sdb                                       8:16   0 59.6G  0 disk
├─sdb1                                    8:17   0    4G  0 part
│ └─md127                                 9:127  0    4G  0 raid1 [SWAP]
├─sdb2                                    8:18   0    2G  0 part
│ └─md125                                 9:125  0    2G  0 raid1 /boot/efi
└─sdb3                                    8:19   0 53.6G  0 part
  └─md126                                 9:126  0 53.6G  0 raid1 /
sdc                                       8:32   1 14.4G  0 disk
└─sdc1                                    8:33   1 14.4G  0 part
sdd                                       8:48   0    2T  0 disk
└─3624a93701561d6718da94a2000011014     252:0    0    2T  0 mpath 
sdf                                       8:80   0    2T  0 disk
└─3624a93701561d6718da94a2000011014     252:0    0    2T  0 mpath 
sdh                                       8:112  0    2T  0 disk
└─3624a93701561d6718da94a2000011014     252:0    0    2T  0 mpath
sdi                                       8:128  0    2T  0 disk
└─3624a93701561d6718da94a2000011014     252:0    0    2T  0 mpath 
[root@KVM01 ~]#


I would recommend it's better to create LVM, which gives to flexibility to expand the disk later for future space requirements.


 fdisk /dev/mapper/3624a93701561d6718da94a2000011014
-- n -- create new partition
-- t -- set 8e for LVM
-- w -- save and exit


Expected output after formatting disk with xfs file system and mounting the data :


[root@KVM01 brick1]# mkfs.xfs -f -i size=512 -L glusterfs /dev/mapper/GFS_PROD_VG-GFS_PROD_LV
meta-data=/dev/mapper/GFS_PROD_VG-GFS_PROD_LV isize=512    agcount=4, agsize=120796160 blks
         =                       sectsz=512   attr=2, projid32bit=1
         =                       crc=1        finobt=1, sparse=1, rmapbt=0
         =                       reflink=1    bigtime=0 inobtcount=0
data     =                       bsize=4096   blocks=483184640, imaxpct=5
         =                       sunit=0      swidth=0 blks
naming   =version 2              bsize=4096   ascii-ci=0, ftype=1
log      =internal log           bsize=4096   blocks=235930, version=2
         =                       sectsz=512   sunit=0 blks, lazy-count=1
realtime =none                   extsz=4096   blocks=0, rtextents=0
Discarding blocks...Done.
[root@KVM01 brick1]#

-- After mounting brick

[root@KVM01 brick1]# df -h
Filesystem                                       Size  Used Avail Use% Mounted on
devtmpfs                                         377G     0  377G   0% /dev
tmpfs                                            378G   12K  378G   1% /dev/shm
tmpfs                                            378G   11M  378G   1% /run
tmpfs                                            378G     0  378G   0% /sys/fs/cgroup
/dev/md126                                        53G  7.4G   43G  15% /
/dev/mapper/3624a93701561d6718da94a2000011014p1  2.0T   15G  2.0T   1% /nodirectwritedata/glusterfs/brick1
/dev/md125                                       2.0G  5.1M  2.0G   1% /boot/efi
tmpfs                                             76G   16K   76G   1% /run/user/42
tmpfs                                             76G  4.0K   76G   1% /run/user/1000


Discovery the GFS Peer

As we have already installed the GFS server RPMs , now we can discover the GFS peer using gluster peer probe command.


-- Execute Peer probe on both the nodes
[root@KVM10 zones]# gluster peer probe KVM01.local.ca
peer probe: success
[root@KVM120 zones]#


[root@KVM01 ~]# gluster pool list
UUID                                    Hostname        State
b744a4e1-fd30-4caa-b4ac-db9fd22cb4c3    KVM01.local.ca  Connected
9a5d68c4-6ca2-459f-a1eb-110225b393a1    localhost       Connected
[root@KVM01 ~]#

[root@KVM02 ~]# gluster pool list
UUID                                    Hostname        State
9a5d68c4-6ca2-459f-a1eb-110225b393a1    KVM02.local.ca  Connected
b744a4e1-fd30-4caa-b4ac-db9fd22cb4c3    localhost       Connected
[root@KVM02 ~]#

Configure GFS Volume

Next step is to create replicated volume for GFS "gluster volume create gvol0 replica 2 KVM01:/nodirectwritedata/glusterfs/brick1/gvol0 KVM02:/nodirectwritedata/glusterfs/brick2/gvol0"


# gluster volume create gvol0 replica 2 KVM01:/nodirectwritedata/glusterfs/brick1/gvol0 KVM02:/nodirectwritedata/glusterfs/brick2/gvol0

[root@KVM01 ~]# gluster volume create gvol0 replica 2 KVM120:/nodirectwritedata/glusterfs/brick1/gvol0 KVM121:/nodirectwritedata/glusterfs/brick2/gvol0
Replica 2 volumes are prone to split-brain. Use Arbiter or Replica 3 to avoid this. See: http://docs.gluster.org/en/latest/Administrator%20Guide/Split%20brain%20and%20ways%20to%20deal%20with%20it/.
Do you still want to continue?
 (y/n) y
volume create: gvol0: success: please start the volume to access data

Now we need to start the volume gvol0.


-- Start the Volume 
gluster volume start gvol0

-- Validate the volume status 
[root@KVM01 ~]#  gluster volume info

Volume Name: gvol0
Type: Replicate
Volume ID: da22b70e-7929-41d3-95f1-542e2220b10a
Status: Started
Snapshot Count: 0
Number of Bricks: 1 x 2 = 2
Transport-type: tcp
Bricks:
Brick1: KVM01:/nodirectwritedata/glusterfs/brick1/gvol0
Brick2: KVM02:/nodirectwritedata/glusterfs/brick2/gvol0
Options Reconfigured:
storage.fips-mode-rchecksum: on
transport.address-family: inet
nfs.disable: on
performance.client-io-threads: off
[root@KVM121 ~]# gluster volume status
Status of volume: gvol0
Gluster process                             TCP Port  RDMA Port  Online  Pid
------------------------------------------------------------------------------
Brick KVM01:/nodirectwritedata/glusterfs/b
rick1/gvol0                                 49152     0          Y       7208
Brick KVM02:/nodirectwritedata/glusterfs/b
rick2/gvol0                                 49152     0          Y       7197
Self-heal Daemon on localhost               N/A       N/A        Y       7214
Self-heal Daemon on KVM120                  N/A       N/A        Y       7225

Task Status of Volume gvol0
------------------------------------------------------------------------------
There are no active volume tasks

[root@KVM01 ~]#

Configure the GFS data domain in OLVM

GFS volume creation is complete, the next big step is to integrate GFS volume with OLVM. If you have two KVM hosts, I would recommend you mount this using localhost:/gvol0. This enables you to mount the same volume on both the servers and the VM disk image will replicate on both sites.


Issue during the data domain configuration


The error you will face while configuring the GFS data domain.


Solution

In OLVM files should be owned by vdsm and kvm. In this case, navigate the volume folder in brick and change the ownership to vdsm:kvm and change permission to 775.


cd /nodirectwritedata/glusterfs/brick1/
chown -R 36:36 gvol0
chmod -R 775 gvol0

cd /nodirectwritedata/glusterfs/brick2/
chown -R 36:36 gvol0
chmod -R 775 gvol0

Once this is complete this will be mounted in green color :)


Final output 

This should be marked with green color status Also this will OLVM to start the data center. you cannot start the data center without a data domain.


Conclusion

Storage technologies are changing at a rapid pace. Having a distributed file system on top of the storage technology (RAID6+1) makes data more redundant and secure. At the moment OLVM supports only GlusterFS as the distributed file system you do not require additional licenses for this cluster file system. Also, this is very easy to configure and it gives high storage throughput by eliminating the metadata read, even  IOPS can be improved by adding more brinks for the GFS.

Next article I will cover VM creation from the ova template.


Monday, November 7, 2022

OLVM - Oracle VM hard partitioning – Addressing oracle licensing policy


Intro 

Virtualized platform with x86 architecture is making an enormous impact on saving IT infrastructure expenditure. Successful implementation is determined by whether the virtualized system reflects an organization's needs and goals. Some organizations lose their grip on compliance due to a lack of understanding of licensing policies. In my view, licensing plays a crucial role when selecting the correct virtual platform. Before coming to any conclusion I would recommend you assess the organization's IT infrastructure servers and categorize them into databases and applications. This helps you plan which servers are migrating to VM platforms and decide the architecture choices to consolidate the servers.

This categorization helps you to decide which virtualized platforms are suitable for the organization in terms of licensing and consolidation. If there are many oracle databases residing on oracle I would recommend you move to Oracle Virtualization. Oracle VM for x86 can be a very remunerative proposal for a company that is either trying to keep Oracle licensing costs down or trying to get out from under an Oracle licensing audit scrutiny to be compliant. However, understanding how Oracle licensing works can be like peeling back the layers of an onion. 

Most organizations choose VMware as their virtual platform market leader. But it’s safe to say that Oracle licensing is not very VMware-friendly. You are generally required to license every core of every server in the cluster. This means not only licensing all the cores on the server you are running the VM (Virtual Machine) on, but all the cores on any server that the VM could potentially be migrated to (think vMotion). 

The best way to overcome this licensing issue is by creating hard partitions.  The partition will help to segment the CPU core as per your core license.

What is partitioning? 

“Partitioning” occurs when the CPUs on a server are separated into individual sections where each section acts as a separate system. Sometimes this is called “segmenting.” There are many hardware and software virtualization technologies available that deliver partitioning capabilities, with varying degrees of resource allocation flexibility.

There are two types of partitions 

  1. Soft partition
  2. Hard partition

Soft partition :

Soft partitioning segments the operating system using OS resource managers. The operating system limits the number of CPUs where an Oracle database is running by creating areas where CPU resources are allocated to applications within the same operating system. This is a flexible way of managing data processing resources since the CPU capacity can be changed fairly easily, as an additional resource is needed. 

Hard partition :

Hard partitioning physically segments a server, by taking a single large server and separating it into distinct smaller systems. Each separated system acts as a physically independent, self-contained server, typically with its own CPUs, operating system, separate boot area, memory, input/output subsystem,   and network resources.

For more details refer : https://www.oracle.com/a/ocom/docs/linux/ol-kvm-hard-partitioning.pdf

Let’s assume that you own 1 processor license for Oracle Database Enterprise Edition, and it's running it on a single socket 8-core server that is running Oracle VM for x86. The core multiplier for Intel Xeon chips is .5 and you own 1 processor license. This equals out to 2 cores. If you have more cores available on the server than what you’re using, then you can implement hard partitioning in Oracle VM for x86. This restricts your database VM to specific vCPUs (Virtual CPUs) and does not allow it to go beyond those limits even though more cores are technically available for use.

NOTE: In the diagrams below, I’m assuming Intel’s HyperThreading technology is being used. This creates two “threads” per core that each appears as a vCPU to Oracle VM for x86. It's safe to say that for every core, you get 2 vCPUs.

you should choose vCPUs that align on core boundaries as much as possible when you configure the partition. In other words, don’t pick vCPU0,2,4 and 6 from cores 0,1,2 and 3 respectively and think you’re only using 2 cores. Even though that may represent 2 cores worth of processing power, to Oracle it is considered to be 4 cores and they will expect you to be licensed as such! Here’s the wrong way to do it:


                                                         Figure 1: Wrong way of pinning vcpu's

Below would be the proper way to pin your vCPUs to stay within core boundaries more effectively:


                                                   Figure 2: Correct way of pinning vcpu's


It's important to know just because we pinned the Vcpus, there is no guarantee that other VMs cant use those very same VCPUs . Assume that we have pinned and non-pinned VMs, the non-pinned VMs could potentially stray onto the pinned VMs' VCPUs and caused unintended performance issues. To avoid this, pin the database VM to its VCPUs and then pin all other VMs to the remaining VCPUs to segregate them. 

Here is the proper way to perform this pinning :


In this article, I will illustrate how to perform hard partitioning.


####### lscpu

[root@KVM120 ~]# lscpu
Architecture:        x86_64
CPU op-mode(s):      32-bit, 64-bit
Byte Order:          Little Endian
CPU(s):              64
On-line CPU(s) list: 0-63
Thread(s) per core:  2
Core(s) per socket:  16
Socket(s):           2
NUMA node(s):        2
Vendor ID:           GenuineIntel
BIOS Vendor ID:      Intel(R) Corporation
CPU family:          6
Model:               85
Model name:          Intel(R) Xeon(R) Gold 6226R CPU @ 2.90GHz
BIOS Model name:     Intel(R) Xeon(R) Gold 6226R CPU @ 2.90GHz
Stepping:            7
CPU MHz:             1199.909
BogoMIPS:            5800.00
Virtualization:      VT-x
L1d cache:           32K
L1i cache:           32K
L2 cache:            1024K
L3 cache:            22528K
NUMA node0 CPU(s):   0-15,32-47
NUMA node1 CPU(s):   16-31,48-63
Flags:               fpu vme de pse tsc msr pae mce cx8 apic sep mtrr pge mca cmov pat pse36 clflush dts acpi mmx fxsr sse sse2 ss ht tm pbe syscall nx pdpe1gb rdtscp lm constant_tsc art arch_perfmon pebs bts rep_good nopl xtopology nonstop_tsc cpuid aperfmperf pni pclmulqdq dtes64 monitor ds_cpl vmx smx est tm2 ssse3 sdbg fma cx16 xtpr pdcm pcid dca sse4_1 sse4_2 x2apic movbe popcnt tsc_deadline_timer aes xsave avx f16c rdrand lahf_lm abm 3dnowprefetch cpuid_fault epb cat_l3 cdp_l3 invpcid_single intel_ppin ssbd mba ibrs ibpb stibp ibrs_enhanced tpr_shadow vnmi flexpriority ept vpid ept_ad fsgsbase tsc_adjust bmi1 avx2 smep bmi2 erms invpcid cqm mpx rdt_a avx512f avx512dq rdseed adx smap clflushopt clwb intel_pt avx512cd avx512bw avx512vl xsaveopt xsavec xgetbv1 xsaves cqm_llc cqm_occup_llc cqm_mbm_total cqm_mbm_local dtherm ida arat pln pts hwp_epp pku ospke avx512_vnni md_clear flush_l1d arch_capabilities
[root@KVM120 ~]#


Understand the current CPU on the hypervisor

On a server running Oracle Linux KVM, you can run the lscpu command to print out the basic CPU configuration of the server hardware. As per this current architecture, we have 6 CPU's and cpu numbering starting with 0.


#### KVM cpu info 
[root@kvm01 ~]# lscpu
Architecture:        x86_64
CPU op-mode(s):      32-bit, 64-bit
Byte Order:          Little Endian
CPU(s):              6
On-line CPU(s) list: 0-5
Thread(s) per core:  1
Core(s) per socket:  6
Socket(s):           1
NUMA node(s):        1
Vendor ID:           GenuineIntel
CPU family:          6
Model:               165
Model name:          Intel(R) Core(TM) i7-10750H CPU @ 2.60GHz
Stepping:            2
CPU MHz:             2592.002
BogoMIPS:            5184.00
Virtualization:      VT-x
Hypervisor vendor:   KVM
Virtualization type: full
L1d cache:           32K
L1i cache:           32K
L2 cache:            256K
L3 cache:            12288K
NUMA node0 CPU(s):   0-5
Flags:               fpu vme de pse tsc msr pae mce cx8 apic sep mtrr pge mca cmov pat pse36 clflush mmx fxsr sse sse2 ht syscall nx rdtscp lm constant_tsc rep_good nopl xtopology nonstop_tsc cpuid tsc_known_freq pni pclmulqdq vmx ssse3 cx16 pcid sse4_1 sse4_2 x2apic movbe popcnt aes xsave avx rdrand hypervisor lahf_lm abm 3dnowprefetch invpcid_single tpr_shadow flexpriority fsgsbase avx2 invpcid rdseed clflushopt md_clear flush_l1d arch_capabilities
[root@kvm01 ~]#


Next step is to check the running vm that we need to pin the cpu.


[root@kvm01 ~]# virsh --readonly list
 Id   Name            State
-------------------------------
 1    oel7-test-tem   running

[root@kvm01 ~]#


Now we need to check vm is pinned to CPU or not , also using this virsh command which CPUs are allocated to the server VM.


[root@kvm01 ~]#  virsh --readonly vcpuinfo oel7-test-tem --pretty
VCPU:           0
CPU:            0
State:          running
CPU time:       68.0s
CPU Affinity:   0-5 (out of 6)

VCPU:           1
CPU:            2
State:          running
CPU time:       49.2s
CPU Affinity:   0-5 (out of 6)

[root@kvm01 ~]#


As per this example, the virtual machine is configured with 2 vCPUs and both can span from thread/core 0 until thread/core 5 (out of 6); so, the virtual CPUs for this virtual machine are not pinned to physical threads/cores.


Configuring Hard Partitioning

To perform this CPU pinning we need to install olvm-vmcontrol utility

The recommended method is to install this olvm-control on OLVM hosted server. Please refer to my OLVM engine installation blog: https://chanaka-dbhelp.blogspot.com/2022/08/olvm-oracle-linux-virtualization.html , This article will help you to set up the engine.


########## install olvm-vmcontrol
Note: We need to installed this seperatly or in olvm engine hosted machine.

dnf install olvm-vmcontrol -y

[root@kvm02 ~]# dnf install olvm-vmcontrol -y
Oracle Linux 8 Gluster Appstream (x86_64)                                                                                           37 kB/s | 3.2 kB     00:00
Oracle Linux 8 BaseOS Latest (x86_64)                                                                                               65 kB/s | 3.6 kB     00:00
Oracle Linux 8 BaseOS Latest (x86_64)                                                                                              9.4 MB/s |  50 MB     00:05
Oracle Linux 8 Application Stream (x86_64)                                                                                          71 kB/s | 3.9 kB     00:00
Oracle Linux 8 Application Stream (x86_64)                                                                                         9.1 MB/s |  38 MB     00:04
Latest oVirt 4.4 Release (x86_64)                                                                                                   33 kB/s | 3.0 kB     00:00
oVirt 4.4 Extra (x86_64)                                                                                                            49 kB/s | 3.0 kB     00:00
Latest Unbreakable Enterprise Kernel Release 6 for Oracle Linux 8 (x86_64)                                                          42 kB/s | 3.0 kB     00:00
Oracle Linux 8 KVM Application Stream (x86_64)                                                                                      45 kB/s | 3.2 kB     00:00
Oracle Linux 8 KVM Application Stream (x86_64)                                                                                     1.7 MB/s | 318 kB     00:00
Dependencies resolved.
===================================================================================================================================================================
 Package                                         Architecture                    Version                                  Repository                          Size
===================================================================================================================================================================
Installing:
 olvm-vmcontrol                                  noarch                          4.4.1-1.1.el8                            ovirt-4.4                           36 k
Installing dependencies:
 java-ovirt-engine-sdk4                          noarch                          4.4.6-1.el8                              ovirt-4.4                          4.4 M

Transaction Summary
===================================================================================================================================================================
Install  2 Packages

Total download size: 4.4 M
Installed size: 5.6 M
Downloading Packages:
(1/2): olvm-vmcontrol-4.4.1-1.1.el8.noarch.rpm                                                                                      24 kB/s |  36 kB     00:01
(2/2): java-ovirt-engine-sdk4-4.4.6-1.el8.noarch.rpm                                                                               1.8 MB/s | 4.4 MB     00:02
-------------------------------------------------------------------------------------------------------------------------------------------------------------------
Total                                                                                                                              1.8 MB/s | 4.4 MB     00:02
Running transaction check
Transaction check succeeded.
Running transaction test
Transaction test succeeded.
Running transaction
  Preparing        :                                                                                                                                           1/1
  Installing       : java-ovirt-engine-sdk4-4.4.6-1.el8.noarch                                                                                                 1/2
  Installing       : olvm-vmcontrol-4.4.1-1.1.el8.noarch                                                                                                       2/2
  Running scriptlet: olvm-vmcontrol-4.4.1-1.1.el8.noarch                                                                                                       2/2
  Verifying        : java-ovirt-engine-sdk4-4.4.6-1.el8.noarch                                                                                                 1/2
  Verifying        : olvm-vmcontrol-4.4.1-1.1.el8.noarch                                                                                                       2/2

Installed:
  java-ovirt-engine-sdk4-4.4.6-1.el8.noarch                                           olvm-vmcontrol-4.4.1-1.1.el8.noarch

Complete!
[root@kvm02 ~]#


To execute this we need to export the OLVM password as an export parameter eg : export OLVMUTIL_PASS=Password

Execution error

I got the error while executing getcpu commands , This error was due to a certificate issue.


[root@kvm02 ~]# olvm-vmcontrol -m kvm02.local.com -u admin@internal -v oel7-test-tem -c getvcpu 
Oracle Linux Virtualization Manager VM Control Utility 4.4.1-1.1
Password:
Error connecting to manager.  Please check manager_hostname, username, password and keystore.
Full error: Failed to send request
Caused by: org.ovirt.engine.sdk4.Error: Failed to parse JSON response
Caused by: javax.net.ssl.SSLException: Unexpected error: java.security.InvalidAlgorithmParameterException: the trustAnchors parameter must be non-empty


Solution

There is an easy way to execute this without the certificate validation bypass by using the flag -f

-f InsecureConnection Append the -f flag to connect to the OLVM Manager without checking for Keystore file and JDK Version. The olvm-vmcontrol utility expects the keystore to be in jks format. So appending the -f flag is a workaround to creating a jks keystore.


[root@kvm02 SSL_CERT]# olvm-vmcontrol -m kvm02.local.com -u admin@internal -v oel7-test-tem -c getvcpu -f
Oracle Linux Virtualization Manager VM Control Utility 4.4.1-1.1
Password:
Connected to Oracle Linux Virtualization Manager 4.4.8.6-1.0.11.el8
Getting vcpu pinning ...
No CPU pinning is configured
[root@kvm02 SSL_CERT]#

This command returns the output for get and shows that VM hard partition is not configured

Allocation of CPUs

We can use olvm-vmcontrol -m kvm02.local.com -u admin@internal -v oel7-test-tem -c setvcpu -s 0,1 -e -f command to pin to cpu As per this example we are pinning to vm to use cpu 0 and cpu 1.

Note: Make sure to reboot the server, then only it will affect the CPU setting.


olvm-vmcontrol -m kvm02.local.com -u admin@internal -v oel7-test-tem -c setvcpu -s 0,1 -e -f
 
[root@kvm02 SSL_CERT]# olvm-vmcontrol -m kvm02.local.com -u admin@internal -v oel7-test-tem -c setvcpu -s 0,1 -e -f
Oracle Linux Virtualization Manager VM Control Utility 4.4.1-1.1
Connected to Oracle Linux Virtualization Manager 4.4.8.6-1.0.11.el8
Setting vcpu pinning ...
Setting VM's "Start Running On: Specific Host(s)" to host kvm01
Trying to pin virtual cpu # 0
Trying to pin virtual cpu # 1
Retrieving vcpu pinning to confirm it has been set...
No CPU pinning is configured

NOTE: if the VM is running you must now stop and then start the VM from the Oracle Linux Virtualization Manager in order for CPU pinning changes to take effect.
NOTE: a restart or a reboot of the VM is not sufficient to put CPU pinning changes into effect.

Validation

Execute getcpu command to validate the server cpu setting are correct.

olvm-vmcontrol -m kvm02.local.com -u admin@internal -v oel7-test-tem -c getvcpu -f -e

 olvm-vmcontrol -m kvm02.local.com -u admin@internal -v oel7-test-tem -c getvcpu -f -e

[root@kvm02]# olvm-vmcontrol -m kvm02.local.com -u admin@internal -v oel7-test-tem -c getvcpu -f -e
Oracle Linux Virtualization Manager VM Control Utility 4.4.1-1.1
Connected to Oracle Linux Virtualization Manager 4.4.8.6-1.0.11.el8
Getting vcpu pinning ...
vcpu 0 pinned to cpuSet[0,1]
vcpu 1 pinned to cpuSet[0,1]
[root@kvm02 SSL_CERT]#

Conclusion

Many organizations suffer from oracle licensing when it comes to virtual platforms. There are many features that come with virtualization that enables the creation of a database server within minutes, due to this flexibility there high chance that the organization violates this oracle licensing policy. 

Oracle licensing is not that supportive for platforms like VMware Esxi. To overcome this we can use hard partitioning. This feature enables organizations to stay within the oracle licensing boundary and avoid unnecessary performance disturbances that can be caused by VCPU sharing. 


Unified Auditing Housekeeping

  Intro  Data is the new currency. It is one of the most valuable organizational assets, however, if that data is not well...