Tuesday, September 6, 2022

Configure KVM Hypervisor with OLVM (Oracle Linux Virtual Manager) - Part 2/5


Intro

acronym:

OLVM - Oracle Linux Virtual Manager
KVM   - Kernel-based Virtual Machine
OVM   - Oracle Virtual Manager
ODA    - Oracle Data Appliance 

OLVM (Oracle Linux Virtual Manager) elevated the KVM (kernel-based virtual Machine)  management processes and reduced administration overhead.  As Oracle is moving out of OVM (Oracle Virtual Manager), customers who are using OVM as their virtualized platform need to plan the OLVM journey. Many small-medium scale businesses are still using virtualized ODA and hosted the VMS on top of ODA.  

I think now is the right time to move out of OVM to Oracle KVM.  KVM hypervisors are much more stable than OVM. Oracle's future plans are combined with open-source virtualization. Also, there are many more features than the OVM. The below-mentioned table demonstrates the enhancements OLVM has over the old OVM platform.


Virtualization technology still has a high demand for managing on-prem databases on top of Oracle KVM.   Also, I have listed down some of the key features of OLVM.

Key features of OLVM
  • Live VM migration between hosts
  • Oracle Enterprise Manager Integration (OEM)
  • CPU Pinning Capabilities
  • VM High Availability
  • Virtual Appliances & Templates (ovf/ova support)
  • Snapshotting of existing VMs. This is an additional feature from OVM
  • Role-based User access
  • Web-based User Interface (UI)
  • Representation State Transfer (REST)
  • Application Programming Interface (API)

Integrate KVM with OLVM

In this article, I will cover how to add pre-existing KVM hypervisor to the OLVM engine. I have shared the oracle note explaining how to prepare the KVM.

https://docs.oracle.com/en/virtualization/oracle-linux-virtualization-manager/getstart/getstarted-manager-install.html#manager-prep-kvm

OL8 server needs to enable the ol8 repo to integrate KVM with OLVM.  Make sure you can have internet access on these hosts to access the repo. Once you configure the KVM then can remove the internet connection from KVM hypervisors.

Friday, September 2, 2022

OLVM (Oracle Linux Virtualization Manager) - Change hostname


Intro

OLVM (Oracle Linux Virtual Manager) is the single point of GUI (web console) that enables system engineers to manage multiple KVMs, Vms, Storage domains and etc ... .  Also note that Oracle Linux KVM is the same hypervisor used in the Oracle Cloud. To get more insight about OCI cloud infrastructure virtualization I shared the below mention pdf to get more understanding about the KVM used in Oracle Cloud: https://www.oracle.com/a/ocom/docs/olvm-datasheet-nov2019.pdf .  Oracle OVM era is over, an alternative to OVM is KVM, offered under Oracle Linux Virtualization Manager (OLVM).

I have shared the oracle documentation link which has all the details related to virtualization.

Oracle Linux Virtualization Manager - Books

Also, Oracle KVM and OLVM come up with many benefits. A few advantages are mentioned below.

  • Complete server virtualization and management solution with zero license cost.
  • Single software distribution for Oracle Linux OS or Oracle Linux KVM.
  • Speeds application deployment with Oracle Virtual Appliances.
  • Hard Partitioning support enables efficient Oracle application software licensing.
  • Full Stack Management with Oracle Enterprise Manager.
  • Path to Oracle Cloud Infrastructure with a common hypervisor

In this article, I will cover how to change the hostname of the OLVM server. This may be required if you need to move OLVM to a different data center with new hostname.

Thursday, August 18, 2022

Virtualized ODA upgrade 18.8.0.0 to 19.8.0.0 - Journey to 12.1.2.12 - 19.13.0.0 - Part 3


ODA upgrade 18.8.0.0 to 19.8.0.0


Hope previous blog posts were useful to address ODA upgrade issues for the virtualization platforms. 

19.13 will be the last upgrade for the virtualized platform, After that oracle going to discontinue OVM and they are moving to KVM-based virtualization. This is going to be a game changer for ODA for performance.

In this article, I will cover the 19.8.0.0 upgrade steps. I will write another article to cover the issues we encountered during the 18.8.0.0 - 19.8.0.0. This is the major jump for ODA. This is going to be more challenging than other upgrades Mainly because previously we had to tackle mainly grid upgrades. Here we need to upgrade the operating system (OS) from oel6 to oel7. So we need to make sure the OS is stable before moving forward with any other component.

Two Major upgrades are 

  1. OS upgrade OEL 6 to OEL 7.
  2. Grid update from 18c to 19c.

Journey to move virtualized ODA to 19.8.0.0. We found this below-mentioned plan from looking at the oracle documents link.

Tuesday, August 16, 2022

OLVM - (Oracle Linux Virtualization Manager) - Part 1/5 (Installation and Configuration)


Intro

Virtualization made a significant change in the IT (Information Technology) industry.  This technology helped many organizations to use server resources efficiently. Server virtualization revolutionized data center management and helped organizations cut the fat out of the IT infrastructure. This was a game changer for data center investments and optimization. Nowadays IT engineers are managing software-driven data centers. 

Virtualization requires the use of a hypervisor, hypervisor abstracts operating systems and applications from their underlying hardware. This enables the host hardware to operate multiple VMs independently of each other and share abstract resources among those VMs.

Virtualization there are two major types.

  1. Full-virtualization 
  2. Para-virtualization

Even though the cloud exists still organizations invest in virtualization technology. Because there are many benefits. A few pros and cons are listed below.

Pros of virtualization

  1. Reduced IT costs, This cost reduction comes from different levels.  
  2. I.   Capital expenditure savings:

    Virtualization enables reducing the cost by reducing the hardware footprint in the data center by requiring fewer hardware servers and related resources to achieve the same level of computing performance, availability, and Scalability. 

    II.  Operational expenditure savings:

    Once servers are virtualized, IT staff can greatly reduce the ongoing administration and management of manual intervention time-consuming processes like server installation.

    III. Data center and energy savings:

           As we shrink company hardware and server footprint, we are lowering the data center energy consumption and square footage.

    2. Efficient resource utilization.

       Most companies spend a lot of capital settings up their systems and server but eventually use only a fraction of it effectively. Virtualization enables to host of multiple VMS on a single hypervisor. This will save the hardware cost and attain a high-efficiency level.

    3. Scalability and Availability.

            Virtualization platforms offer many advanced features that are not found on physical servers. Which increases the uptime and availability. Although vendor feature names may be different, all provide features like 

    • Live migration
    • Storage migration
    • fault tolerance
    • high availability.
    • distribute resource scheduling.
These features elevated the ability to recover from unplanned outages. 

     4. Ease the cloud migration.

       If there is a plan to move to the cloud, virtualization makes this easy. Because cloud and virtualization use the same technology stack.

Cons of virtualization

  1. The upfront costs are hefty.
  2. Not all the hardware or software can be virtualized
  3. It's easily carried away with adding servers. 

Last decade there is a significant improvement in open source virtualization technology.  Oracle also change the view of the virtualization path by moving from OVM to KVM (Kernel Based Virtual Machine). KVM is actually an open-source virtualization technology that turns Linux into a hypervisor. Also, Oracle came up with a management engine to manage multiple hypervisors called OLVM (Oracle Linux Virtualization Manager) this is a similar product to VMware vcenter.

OLVM Installation and Configuration.

In this article, I will cover OLVM (Oracle Linux Virtualization Manager) installation and other administrative tasks like adding a KVM host to OLVM etc.. This environment I have hosted in a VirtualBox environment. (Nested virtualization). I will explain how to set up the nested virtualized environment in VBox.

I have mentioned the oracle documentation link for OLVM-engine 4.4 installation and configuration.

Installation and Configuration (oracle.com)

Required Packages 

First, we need to enable the oracle Linux 8 repository. We need to enable an internet connection to the KVM server or need to create a sample repository.


dnf install oracle-ovirt-release-el8
Sample output

[root@kvm02 ~]# dnf install oracle-ovirt-release-el8
Last metadata expiration check: 0:02:04 ago on Fri 22 Jul 2022 12:08:59 AM EDT.
Dependencies resolved.
===============================================================================================================================================================================================================
 Package                                                    Architecture                             Version                                         Repository                                           Size
===============================================================================================================================================================================================================
Installing:
 oracle-ovirt-release-el8                                   x86_64                                   1.0-1.0.3.el8                                   ol8_baseos_latest                                    23 k

Transaction Summary
===============================================================================================================================================================================================================
Install  1 Package

Total download size: 23 k
Installed size: 35 k
Is this ok [y/N]: y
Downloading Packages:
oracle-ovirt-release-el8-1.0-1.0.3.el8.x86_64.rpm                                                                                                                              9.0 kB/s |  23 kB     00:02
---------------------------------------------------------------------------------------------------------------------------------------------------------------------------------------------------------------
Total                                                                                                                                                                          9.0 kB/s |  23 kB     00:02
Running transaction check
Transaction check succeeded.
Running transaction test
Transaction test succeeded.
Running transaction
  Preparing        :                                                                                                                                                                                       1/1
  Running scriptlet: oracle-ovirt-release-el8-1.0-1.0.3.el8.x86_64                                                                                                                                         1/1
  Installing       : oracle-ovirt-release-el8-1.0-1.0.3.el8.x86_64                                                                                                                                         1/1
  Running scriptlet: oracle-ovirt-release-el8-1.0-1.0.3.el8.x86_64                                                                                                                                         1/1
Enabling OLVM 4.4 required Yum Channels...
Enabling ol8_baseos_latest Yum Channel...
Enabling ol8_UEKR6 Yum Channel...
Enabling ol8_gluster_appstream Yum Channel...
Enabling ol8_kvm_appstream Yum Channel...
Disabling yum module virt:ol
Enabling yum module virt:kvm_utils2
Enabling module pki-deps
Enabling module postgresql:13
Required oVirt 4.4 Yum Channels enabled.
Done.

  Verifying        : oracle-ovirt-release-el8-1.0-1.0.3.el8.x86_64                                                                                                                                         1/1

Installed:
  oracle-ovirt-release-el8-1.0-1.0.3.el8.x86_64

Complete!
[root@kvm02 ~]#

List repository

This will enable the new oel 8 repository required for KVM installation.


[root@kvm02 ~]# dnf repolist
repo id                                                                      repo name
ol8_UEKR6                                                                    Latest Unbreakable Enterprise Kernel Release 6 for Oracle Linux 8 (x86_64)
ol8_appstream                                                                Oracle Linux 8 Application Stream (x86_64)
ol8_baseos_latest                                                            Oracle Linux 8 BaseOS Latest (x86_64)
ol8_gluster_appstream                                                        Oracle Linux 8 Gluster Appstream (x86_64)
ol8_kvm_appstream                                                            Oracle Linux 8 KVM Application Stream (x86_64)
ovirt-4.4                                                                    Latest oVirt 4.4 Release (x86_64)
ovirt-4.4-extra                                                              oVirt 4.4 Extra (x86_64)
[root@kvm02 ~]#


Install Engine

Execute the "installed ovirt-engine" mentioned commands to install the engine-related packages.


dnf install ovirt-engine

Configure Engine


Make sure the hostname is configured with FQDN (Full qualified domain name) eg:kvm02.local.com

To configure the engine setup need to execute the engine-setup command. If need to accept all the default values execute engine-setup --accept-defaults to automatically accept all questions that have default answers.

Sample output


[root@kvm02 ~]# engine-setup
[ INFO  ] Stage: Initializing
[ INFO  ] Stage: Environment setup
          Configuration files: /etc/ovirt-engine-setup.conf.d/10-packaging-jboss.conf, /etc/ovirt-engine-setup.conf.d/10-packaging.conf
          Log file: /var/log/ovirt-engine/setup/ovirt-engine-setup-20220725103208-vp6a4t.log
          Version: otopi-1.9.5 (otopi-1.9.5-1.el8)
[ INFO  ] Stage: Environment packages setup
[ INFO  ] Stage: Programs detection
[ INFO  ] Stage: Environment setup (late)
[ INFO  ] Stage: Environment customization

          --== PRODUCT OPTIONS ==--

          Configure Cinderlib integration (Currently in tech preview) (Yes, No) [No]:
          Configure Engine on this host (Yes, No) [Yes]:

          Configuring ovirt-provider-ovn also sets the Default cluster's default network provider to ovirt-provider-ovn.
          Non-Default clusters may be configured with an OVN after installation.
          Configure ovirt-provider-ovn (Yes, No) [Yes]:
          Configure WebSocket Proxy on this host (Yes, No) [Yes]:

          * Please note * : Data Warehouse is required for the engine.
          If you choose to not configure it on this host, you have to configure
          it on a remote host, and then configure the engine on this host so
          that it can access the database of the remote Data Warehouse host.
          Configure Data Warehouse on this host (Yes, No) [Yes]:
          Configure VM Console Proxy on this host (Yes, No) [Yes]:
          Configure Grafana on this host (Yes, No) [Yes]:

          --== PACKAGES ==--

[ INFO  ] Checking for product updates...
[ INFO  ] DNF Package grafana-postgres available, but not installed.
[ INFO  ] No product updates found

          --== NETWORK CONFIGURATION ==--

          Host fully qualified DNS name of this server [kvm02.local.com]:
[WARNING] Failed to resolve kvm02.local.com using DNS, it can be resolved only locally

          Setup can automatically configure the firewall on this system.
          Note: automatic configuration of the firewall may overwrite current settings.
          Do you want Setup to configure the firewall? (Yes, No) [Yes]:
[ INFO  ] firewalld will be configured as firewall manager.

          --== DATABASE CONFIGURATION ==--

          Where is the DWH database located? (Local, Remote) [Local]:

          Setup can configure the local postgresql server automatically for the DWH to run. This may conflict with existing applications.
          Would you like Setup to automatically configure postgresql and create DWH database, or prefer to perform that manually? (Automatic, Manual) [Automatic]:
          Where is the Engine database located? (Local, Remote) [Local]:

          Setup can configure the local postgresql server automatically for the engine to run. This may conflict with existing applications.
          Would you like Setup to automatically configure postgresql and create Engine database, or prefer to perform that manually? (Automatic, Manual) [Automatic]:

          --== OVIRT ENGINE CONFIGURATION ==--

          Engine admin password:
          Confirm engine admin password:
[WARNING] Password is weak: The password is shorter than 8 characters
          Use weak password? (Yes, No) [No]: Yes
          Application mode (Virt, Gluster, Both) [Both]:
          Use default credentials (admin@internal) for ovirt-provider-ovn (Yes, No) [Yes]:

          --== STORAGE CONFIGURATION ==--

          Default SAN wipe after delete (Yes, No) [No]:

          --== PKI CONFIGURATION ==--

          Organization name for certificate [local.com]:

          --== APACHE CONFIGURATION ==--

          Setup can configure the default page of the web server to present the application home page. This may conflict with existing applications.
          Do you wish to set the application as the default page of the web server? (Yes, No) [Yes]:

          Setup can configure apache to use SSL using a certificate issued from the internal CA.
          Do you wish Setup to configure that, or prefer to perform that manually? (Automatic, Manual) [Automatic]:

          --== SYSTEM CONFIGURATION ==--


          --== MISC CONFIGURATION ==--

          Please choose Data Warehouse sampling scale:
          (1) Basic
          (2) Full
          (1, 2)[1]:
          Use Engine admin password as initial Grafana admin password (Yes, No) [Yes]:

          --== END OF CONFIGURATION ==--

[ INFO  ] Stage: Setup validation
[WARNING] Less than 16384MB of memory is available

          --== CONFIGURATION PREVIEW ==--

          Application mode                        : both
          Default SAN wipe after delete           : False
          Host FQDN                               : kvm02.local.com
          Firewall manager                        : firewalld
          Update Firewall                         : True
          Set up Cinderlib integration            : False
          Configure local Engine database         : True
          Set application as default page         : True
          Configure Apache SSL                    : True
          Engine database host                    : localhost
          Engine database port                    : 5432
          Engine database secured connection      : False
          Engine database host name validation    : False
          Engine database name                    : engine
          Engine database user name               : engine
          Engine installation                     : True
          PKI organization                        : local.com
          Set up ovirt-provider-ovn               : True
          Grafana integration                     : True
          Grafana database user name              : ovirt_engine_history_grafana
          Configure WebSocket Proxy               : True
          DWH installation                        : True
          DWH database host                       : localhost
          DWH database port                       : 5432
          DWH database secured connection         : False
          DWH database host name validation       : False
          DWH database name                       : ovirt_engine_history
          Configure local DWH database            : True
          Configure VMConsole Proxy               : True

          Please confirm installation settings (OK, Cancel) [OK]:
[ INFO  ] Stage: Transaction setup
[ INFO  ] Stopping engine service
[ INFO  ] Stopping ovirt-fence-kdump-listener service
[ INFO  ] Stopping dwh service
[ INFO  ] Stopping vmconsole-proxy service
[ INFO  ] Stopping websocket-proxy service
[ INFO  ] Stage: Misc configuration (early)
[ INFO  ] Stage: Package installation
[ INFO  ] DNF Downloading 4 files, 16083.99KB
[ INFO  ] DNF Downloaded ovirt-vmconsole-1.0.9-3.el8.noarch.rpm
[ INFO  ] DNF Downloaded selinux-policy-3.14.3-80.0.4.el8_5.2.noarch.rpm
[ INFO  ] DNF Downloaded selinux-policy-targeted-3.14.3-80.0.4.el8_5.2.noarch.rpm
[ INFO  ] DNF Downloaded ovirt-vmconsole-proxy-1.0.9-3.el8.noarch.rpm
[ INFO  ] DNF Upgraded: selinux-policy-3.14.3-80.0.4.el8_5.2.noarch
[ INFO  ] DNF Upgraded: selinux-policy-targeted-3.14.3-80.0.4.el8_5.2.noarch
[ INFO  ] DNF Upgraded: ovirt-vmconsole-1.0.9-3.el8.noarch
[ INFO  ] DNF Upgraded: ovirt-vmconsole-proxy-1.0.9-3.el8.noarch
[ INFO  ] DNF Unknown: ovirt-vmconsole-proxy-1.0.9-2.el8.noarch
[ INFO  ] DNF Unknown: ovirt-vmconsole-1.0.9-2.el8.noarch
[ INFO  ] DNF Unknown: selinux-policy-targeted-3.14.3-80.0.1.el8.noarch
[ INFO  ] DNF Unknown: selinux-policy-3.14.3-80.0.1.el8.noarch
[ INFO  ] DNF Verify: selinux-policy-3.14.3-80.0.4.el8_5.2.noarch 1/8
[ INFO  ] DNF Verify: selinux-policy-3.14.3-80.0.1.el8.noarch 2/8
[ INFO  ] DNF Verify: selinux-policy-targeted-3.14.3-80.0.4.el8_5.2.noarch 3/8
[ INFO  ] DNF Verify: selinux-policy-targeted-3.14.3-80.0.1.el8.noarch 4/8
[ INFO  ] DNF Verify: ovirt-vmconsole-1.0.9-3.el8.noarch 5/8
[ INFO  ] DNF Verify: ovirt-vmconsole-1.0.9-2.el8.noarch 6/8
[ INFO  ] DNF Verify: ovirt-vmconsole-proxy-1.0.9-3.el8.noarch 7/8
[ INFO  ] DNF Verify: ovirt-vmconsole-proxy-1.0.9-2.el8.noarch 8/8
[ INFO  ] Stage: Misc configuration
[ INFO  ] Upgrading CA
[ INFO  ] Initializing PostgreSQL
[ INFO  ] Creating PostgreSQL 'engine' database
[ INFO  ] Configuring PostgreSQL
[ INFO  ] Creating PostgreSQL 'ovirt_engine_history' database
[ INFO  ] Configuring PostgreSQL
[ INFO  ] Creating CA: /etc/pki/ovirt-engine/ca.pem
[ INFO  ] Creating CA: /etc/pki/ovirt-engine/qemu-ca.pem
[ INFO  ] Updating OVN SSL configuration
[ INFO  ] Updating OVN timeout configuration
[ INFO  ] Creating/refreshing DWH database schema
[ INFO  ] Setting up ovirt-vmconsole proxy helper PKI artifacts
[ INFO  ] Setting up ovirt-vmconsole SSH PKI artifacts
[ INFO  ] Configuring WebSocket Proxy
[ INFO  ] Creating/refreshing Engine database schema
[ INFO  ] Creating a user for Grafana
[ INFO  ] Creating/refreshing Engine 'internal' domain database schema
[ INFO  ] Creating default mac pool range
[ INFO  ] Adding default OVN provider to database
[ INFO  ] Adding OVN provider secret to database
[ INFO  ] Setting a password for internal user admin
[ INFO  ] Install selinux module /usr/share/ovirt-engine/selinux/ansible-runner-service.cil
[ INFO  ] Generating post install configuration file '/etc/ovirt-engine-setup.conf.d/20-setup-ovirt-post.conf'
[ INFO  ] Stage: Transaction commit
[ INFO  ] Stage: Closing up
[ INFO  ] Starting engine service
[ INFO  ] Starting dwh service
[ INFO  ] Starting Grafana service
[ INFO  ] Restarting ovirt-vmconsole proxy service

          --== SUMMARY ==--

[ INFO  ] Restarting httpd
          Please use the user 'admin@internal' and password specified in order to login
          Web access is enabled at:
              http://kvm02.local.com:80/ovirt-engine
              https://kvm02.local.com:443/ovirt-engine
          Internal CA CF:C8:A2:E0:42:FE:5F:19:55:B3:E2:9F:A9:7F:4C:DC:49:8D:C7:CB
          SSH fingerprint: SHA256:aRJ1E8zUzNaYsXG2tCfvV4EGTMxw/mMzrKQQt2ZFZKE
[WARNING] Less than 16384MB of memory is available
          Web access for grafana is enabled at:
              https://kvm02.local.com/ovirt-engine-grafana/
          Please run the following command on the engine machine kvm02.local.com, for SSO to work:
          systemctl restart ovirt-engine

          --== END OF SUMMARY ==--

[ INFO  ] Stage: Clean up
          Log file is located at /var/log/ovirt-engine/setup/ovirt-engine-setup-20220725103208-vp6a4t.log
[ INFO  ] Generating answer file '/var/lib/ovirt-engine/setup/answers/20220725103526-setup.conf'
[ INFO  ] Stage: Pre-termination
[ INFO  ] Stage: Termination
[ INFO  ] Execution of setup completed successfully
[root@kvm02 ~]#


Config Firewall

Enable the below-mentioned firewall rule to access the olvm url.


firewall-cmd --zone=public --permanent --add-service=https
firewall-cmd --zone=public --permanent --add-service=http
firewall-cmd --reload


Access the URL


OLVM URL can be found in the engine setup summary section, This figure shows the main URL of the virtual manager.


Login


Once you click the administration portal, you can log in to the login page. The username for the administration portal is admin.


Dashboard


This figure shows the main dashboard, the dashboard has the main tab to navigate the data-center, cluster, host, VM (virtual machines), and Storage domains.


Conclusion


Virtualization is the best solution to utilize resources efficiently and reduce the data center footprint. Last decade virtual manager and virtualization technology have improved drastically on open source platforms. It's not easy to manage 100 to 300 KVM separately by login into each URL. OLVM (Oracle Linux virtualization manager) will act as a single point of contact to manage all the DC (data center), KVM, and VM (Virtual Machine) and storage domains. The best practice should be to host this machine out of the KVM server. As many developers working on this OLVM, this will be more mature with many more features. Also, virtualization is the backbone of the cloud platform which enabled the software-driven data center concept. 

Next article I will cover the Storage domain configuration and VM creation.


Thursday, July 21, 2022

ODA X5 - DB home creation error (racclonepl.sh)


Intro 


ODA (Oracle Data Appliance) virtualized platform is orchestrated by oakcli tool, Changes like database creation, database home creation, deleting database homes, etc need to be performed by oakcli tool. As this is fully scripted, we should have a clear understanding of oracle internals to troubleshoot issues encountered via oakcli tool.

Most of the issues encountered during oakcli commands execution are complicated but solutions are simpler. Even it comes to 19.13.0.0 environment is tune and sound. But to troubleshoot the issue my advice would be to analyze the log to find the root cause of the problem.

In addition, Oracle announces discontinue of  OVM , going forward oracle OVM is replace by KVM (Kernal Virtual machine)

ODA (Oracle Data Appliance) virtualized (OVM) based coming to end of support from 19.13. After 19.13 oracle will move with KVM base virtualization. In my view, KVM (Kernal virtual machine ) is much more stable than OVM.

In this article, I will cover to steps to create a new oracle 19.13 home and the issues we faced during the new database home creation.

Friday, June 24, 2022

Azure DB template image - Part 1 (VM creation, Oracle grid and db software only installation)


Intro

In the current era, businesses are focusing on optimizing  IT infrastructure workloads adopting cloud models like AWS, Azure, GCP and OCI.  Cloud environments provide many on-demand resources which enable organizations to unleash their full potential to expand their market share.

Also moving to the cloud enables greater flexibility to control IT infrastructure costs. In any organization, major workloads are coming from databases. Cloud platforms have many services to get a clear understanding of cost predictions for heavy workloads. 

When moving to the cloud it's really important to compare costs and the features each cloud provides. Microsft Azure came to the cloud in an early stage and it is a strong platform to migrate application and database workloads. Moreover, Migrating databases to azure is challenging and the ongoing market is really hot.

Many businesses want to have multiple test environments before moving to prod changes. It's important to create custom images and build an environment quickly and efficiently. In this article, I will cover how we can create an oracle custom snapshot to create a VM.

Let's start with VM creation.

Create a VM in azure

Login to the Azure portal and select virtual machine


Azure work as an on-demand subscription model. Provide a suitable name for VM and Region (Better to go with the closest region to avoid network latency. Select the respective availability zone and the security type.

Here I'm going to use OEL 8.5 and the server model is standard D2s_v3 for this testing. Database workload it's recommended to go with E - Series. E- Series servers are memory-optimized servers to cater to database workloads. Also for the database servers, azure has a really good selection of memory-optimized VM templates.

Shared below mention links to get a better understanding of server versions and associate costs for each server.


Server Versions 

https://azure.microsoft.com/en-ca/pricing/details/virtual-machines/series/

Associate cost 

https://azure.microsoft.com/en-ca/pricing/details/virtual-machines/linux/#edv4-series


There are two options setup an administrator password.

  1. Setup user and a strong password.
  2. Use generated the ssh public key 


As this is oracle ASM (standalone installation ) I have added 4 disks including 2 disks for DATA (external redundancy) and one FRA. 


As this is a test I'm using public IP address. Make sure to create Virtual-network then only you can select this Virtual network.


The last step for VM creation check validation is passed.


Partitioning of disk and mount /u01


Execute lsblk to view all the attached disks and use fdisk commands to partition the disk. Once you format the partition disk to the ext4 file system make sure to add this to the disk to the partition table by executing partprob. Do not miss this step, if you missed this VM will not come up and will hand on the boot section.

These are the commands you needs to be execute to add partition to vm.

##### correct commands 
fdisk /dev/sdc1
mkfs.ext4 /dev/sdc1
partprobe /dev/sdc1
blkid
mkdir /u01
mount -a -- after adding this disk blkid to fstab

After creating a partition , you can use lsblk to validate partition


[azuser@localhost ~]$ lsblk
NAME               MAJ:MIN RM  SIZE RO TYPE MOUNTPOINT
sda                  8:0    0   30G  0 disk
├─sda1               8:1    0  800M  0 part /boot
├─sda2               8:2    0 28.7G  0 part
│ ├─rootvg-rootlv  252:0    0 18.7G  0 lvm  /
│ └─rootvg-crashlv 252:1    0   10G  0 lvm  /var/crash
├─sda14              8:14   0    4M  0 part
└─sda15              8:15   0  495M  0 part /boot/efi
sdb                  8:16   0   75G  0 disk
└─sdb1               8:17   0   75G  0 part /mnt
sdc                  8:32   0  128G  0 disk
└─sdc1               8:33   0  128G  0 part 
sdd                  8:48   0  512G  0 disk
└─sdd1               8:49   0  512G  0 part
sde                  8:64   0  512G  0 disk


Sample blkid output


Execute partprobe command to add a disk to the partition table and use mkfs.ext4 to format the disk.  As the last step execute blkid to get the respective block id .


[root@oradb-01 ~]# blkid
/dev/mapper/rootvg-crashlv: UUID="cdf585f6-703a-4aef-b8de-404c9883a58e" BLOCK_SIZE="512" TYPE="xfs"
/dev/sde2: UUID="Z1I6oC-RWrU-DQPh-tkiS-VZP3-aGNb-khAaSc" TYPE="LVM2_member" PARTUUID="7239f924-9e5f-406f-b5b7-88862e86ea8d"
/dev/sde1: UUID="c5d1e180-5e1d-43c6-9ed6-c8ac37cb8061" BLOCK_SIZE="512" TYPE="xfs" PARTUUID="83c7509b-9398-4ca4-847a-59f03e4f9577"
/dev/sde14: PARTUUID="1833132d-49f6-4ae0-861a-30eda86be687"
/dev/sde15: SEC_TYPE="msdos" UUID="3503-1054" BLOCK_SIZE="512" TYPE="vfat" PARTLABEL="EFI System Partition" PARTUUID="0c2aee3b-7c66-42e5-91b3-52a8d2d7db16"
/dev/sdf1: UUID="06cd70bc-adec-4ab9-951e-eada6e45941d" BLOCK_SIZE="4096" TYPE="ext4" PARTUUID="619336a7-01"
/dev/sda1: UUID="6f9f562e-afe1-423e-8846-9ab001150f7c" BLOCK_SIZE="4096" TYPE="ext4" PARTUUID="727ac55d-01"
/dev/mapper/rootvg-rootlv: UUID="c866304a-09ef-4c3b-87cf-00f321a52356" BLOCK_SIZE="512" TYPE="xfs"
[root@oradb-01 ~]#

lsblk output mount /u01


[azuser@localhost ~]$ lsblk
NAME               MAJ:MIN RM  SIZE RO TYPE MOUNTPOINT
sda                  8:0    0   30G  0 disk
├─sda1               8:1    0  800M  0 part /boot
├─sda2               8:2    0 28.7G  0 part
│ ├─rootvg-rootlv  252:0    0 18.7G  0 lvm  /
│ └─rootvg-crashlv 252:1    0   10G  0 lvm  /var/crash
├─sda14              8:14   0    4M  0 part
└─sda15              8:15   0  495M  0 part /boot/efi
sdb                  8:16   0   75G  0 disk
└─sdb1               8:17   0   75G  0 part /mnt
sdc                  8:32   0  256G  0 disk
└─sdc1               8:33   0  256G  0 part /u01
sdd                  8:48   0  512G  0 disk
└─sdd1               8:49   0  512G  0 part
sde                  8:64   0  512G  0 disk


Azure documentation is very well organized and crystal clear on ASM installation steps. Please find the below mention links from azure knowledge base for asm installation.

https://docs.microsoft.com/en-us/azure/virtual-machines/workloads/oracle/configure-oracle-asm

Installed required RPMs for Oracle 19c database

Download and install oracle-preinstall-19c rpm and installed it on the server.


curl -o oracle-database-preinstall-19c-1.0-1.el7.x86_64.rpm https://yum.oracle.com/repo/OracleLinux/OL7/latest/x86_64/getPackage/oracle-database-preinstall-19c-1.0-1.el7.x86_64.rpm
yum -y localinstall oracle-database-preinstall-19c-1.0-1.el7.x86_64.rpm

Installed required RPMs for oracle 19c grid


First installed oracle-database-preinstalled-19c rpm , Once the preinstalled is complete, Make sure to install required oracleasm RPMs , we need these RPMs for asm disk configuration.


[root@oradb-01 ~]# rpm -qa |grep oracleasm
kmod-redhat-oracleasm-2.0.8-12.2.0.1.el8.x86_64
oracleasm-support-2.1.12-1.el8.x86_64
oracleasmlib-2.0.17-1.el8.x86_64
[root@oradb-01 ~]#


Add required groups and users for the installation. Creating only oracle user for both grid and db installation


groupadd -g 54345 asmadmin 
groupadd -g 54346 asmdba 
groupadd -g 54347 asmoper 
useradd -u 3000 -g oinstall -G dba,asmadmin,asmdba,asmoper oracle 
usermod -g oinstall -G dba,asmdba,asmadmin,asmoper oracle

Configure ASM

After installing the asm , configure the ASM library for server startup.


[root@oradb-01 ~]# oracleasm configure -i
Configuring the Oracle ASM library driver.

This will configure the on-boot properties of the Oracle ASM library
driver.  The following questions will determine whether the driver is
loaded on boot and what permissions it will have.  The current values
will be shown in brackets ('[]').  Hitting ENTER without typing an
answer will keep that current value.  Ctrl-C will abort.

Default user to own the driver interface []: oracle
Default group to own the driver interface []: asmadmin
Start Oracle ASM library driver on boot (y/n) [n]: Y
Scan for Oracle ASM disks on boot (y/n) [y]: Y
Writing Oracle ASM library driver configuration: done
[root@oradb-01 ~]#

Once the configuration is complete validate the asm status, Make sure the status is correct after restarting the oracleasm service, If there are any errors this going to impact on server startup.

Validate server status


[root@oradb-01 ~]# oracleasm status
Checking if ASM is loaded: yes
Checking if /dev/oracleasm is mounted: yes
[root@oradb-01 ~]#

Validate from systemctl


[root@oradb-01 ~]# systemctl start oracleasm
[root@oradb-01 ~]# systemctl status oracleasm
● oracleasm.service - Load oracleasm Modules
   Loaded: loaded (/usr/lib/systemd/system/oracleasm.service; enabled; vendor preset: disabled)
   Active: active (exited) since Thu 2022-06-23 17:23:51 UTC; 5s ago
  Process: 16982 ExecStart=/usr/sbin/oracleasm.init start_sysctl (code=exited, status=0/SUCCESS)
 Main PID: 16982 (code=exited, status=0/SUCCESS)

Jun 23 17:23:50 oradb-01 systemd[1]: Starting Load oracleasm Modules...
Jun 23 17:23:50 oradb-01 oracleasm.init[16982]: Initializing the Oracle ASMLib driver: OK
Jun 23 17:23:51 oradb-01 oracleasm.init[16982]: Scanning the system for Oracle ASMLib disks: OK
Jun 23 17:23:51 oradb-01 systemd[1]: Started Load oracleasm Modules.


Create a directory for grid and DB installation


mkdir -p /u01/app/19.0.0.0/grid 
mkdir -p /u01/app/oracle/product/19.0.0/dbhome_1
chown oracle:oinstall /u01/app/19.0.0.0/grid
chown oracle:oinstall /u01/app/oracle/product/19.0.0/dbhome_1

19C grid installation

Here we will perform a software-only installation because we are going to use these images later to create new environments.

I have posted the screenshots for software-only installation. As per this figure select only the "Set up Software Only".


As per the below-mentioned figure select the respective ASM group for the installation.


As this is a test installation ignore the physical memory requirement.


Installation summary 


Execute root.sh scripts as root to complete the installation.


Expected root.sh outputs.


[root@oradb-01 ~]# /u01/app/oraInventory/orainstRoot.sh
Changing permissions of /u01/app/oraInventory.
Adding read,write permissions for group.
Removing read,write,execute permissions for world.

Changing groupname of /u01/app/oraInventory to oinstall.
The execution of the script is complete.
[root@oradb-01 ~]# /u01/app/19.0.0.0/grid/root.sh
Performing root user operation.

The following environment variables are set as:
    ORACLE_OWNER= oracle
    ORACLE_HOME=  /u01/app/19.0.0.0/grid

Enter the full pathname of the local bin directory: [/usr/local/bin]:
   Copying dbhome to /usr/local/bin ...
   Copying oraenv to /usr/local/bin ...
   Copying coraenv to /usr/local/bin ...


Creating /etc/oratab file...
Entries will be added to the /etc/oratab file as needed by
Database Configuration Assistant when a database is created
Finished running generic part of root script.
Now product-specific root actions will be performed.

To configure Grid Infrastructure for a Cluster or Grid Infrastructure for a Stand-Alone Server execute the following command as oracle user:
/u01/app/19.0.0.0/grid/gridSetup.sh
This command launches the Grid Infrastructure Setup Wizard. The wizard also supports silent operation, and the parameters can be passed through the response file that is available in the installation media.

[root@oradb-01 ~]#


 DB Installation

As I mentioned earlier, We are going to use these images to create new database servers so we should perform a software-only installation.


Azure does not support oracle-RAC installation, so make sure to select a single instance only.


Select respective edition, Here I will select Enterprise Edition.


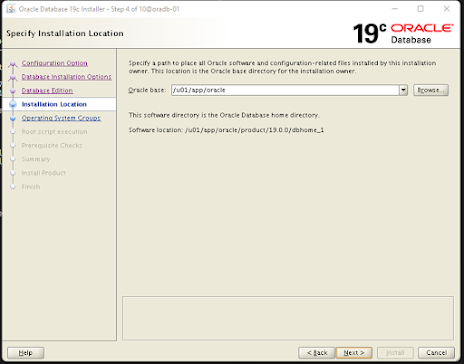
Specify the base directory 


Select required roles for installation.


I have not provided the sudo privileges to run the root.sh script.


Validate the pre-requisites page. I will create another blog to configure the swap mount in azure.


Execute root.sh as root to complete the installation.


Create a Snapshot of the disk

Once the grid and database software only installations are complete without any issue.
We need to power off the server to get the consistency of disk images.


We need to take two snapshots 
  1. OS disk
  2. Oracle binary installation disk

Under mentioned figure shows the create snapshot option after navigating to the disk.


Once the disk snapshots are created, navigate to the snapshot tab to verify the snap disk.


Conclusion

In this article, I have covered VM creation and installation of the grid and DB. Azure does not have template images with Oracle ASM installation. In part 2, I will cover the new VM creation using these snap disks.


Monday, June 6, 2022

ODA - 18.8.0.0 - OVM upgrade issue


ODA (Oracle Data Appliance) upgrades are challenging and need to be ready to spend more hours on upgrades due to unexpected failures.  As a proactive measurement, you should be ready to face these unexpected failures by creating a proactive SR with oracle. In this article, I will cover the upgrades issue encountered for 18.3.0.0 to 18.8.0.0.  The major component in the upgrading is the grid.

We encountered a major issue while upgrading the OVM on DOM0. Even if the component shows that the OVM version is up to date, oakcli orchestration tool revalidates this version by rerunning the required rpm on dom0 and the bug was hitting on opensm component , opensm is "an InfiniBand compliant Subnet Manager and Administration"


Using "oakcli update -patch 18.8.0.0.0 --verify" commands can verify the patch version after unpack.


###### localhost
[root@localhost ~]# oakcli update -patch  18.8.0.0.0 --verify
INFO: 2022-05-27 22:00:05: Reading the metadata file now...
                Component Name            Installed Version         Proposed Patch Version
                ---------------           ------------------        -----------------
                Controller_INT            4.650.00-7176             Up-to-date
                Controller_EXT            13.00.00.00               Up-to-date
                Expander                  0018                      001E
                SSD_SHARED {
                [ c1d20,c1d21,c1d22,      A29A                      Up-to-date
                c1d23 ]
                [ c1d16,c1d17,c1d18,      A29A                      Up-to-date
                c1d19 ]
                             }
                HDD_LOCAL                 A7E0                      Up-to-date
                HDD_SHARED {
                [ c1d0,c1d1,c1d2,c1d      PAG1                      PD51
                3,c1d4,c1d6,c1d7,c1d
                8,c1d9,c1d10,c1d12,c
                1d13,c1d14,c1d15 ]
                [ c1d5,c1d11 ]            PD51                      Up-to-date
                             }
                ILOM                      4.0.2.26.b r125868        4.0.4.52 r132805
                BIOS                      30130500                  30300200
                IPMI                      1.8.12.4                  1.8.15.0
                HMP                       2.4.1.0.14                2.4.5.0.1
                OAK                       18.3.0.0.0                18.8.0.0.0
                OL                        6.10                      Up-to-date
                OVM                       3.4.4                     Up-to-date
                GI_HOME                   18.3.0.0.180717           18.8.0.0.191015
                DB_HOME                   12.1.0.2.160119           12.1.0.2.191015
                ASR                       18.3.1                    19.4.0
[root@localhost ~]#

This OVM issue was directly impacting patching from 18.3.0.0 to 18.8.0.0, DOM0 patching failed when trying to upgrade to OVM to 3.4.4. While upgrading DOM0, stopping the opensm using the command "service opensmd stop" caused the process to not come up after the network service restart . Parameters are read from the “/etc/rc.local” file.

Below is the main server patching log.

Error 

Main Server Patching Log : 

This is the main server patch log and highlighted OVM update error for clarity.

2022-05-28 04:44:03: Executing cmd: /u01/app/18.0.0.0/grid/bin/crsctl check cluster
2022-05-28 04:44:03: Command output:
>  CRS-4535: Cannot communicate with Cluster Ready Services
>  CRS-4530: Communications failure contacting Cluster Synchronization Services daemon
>  CRS-4534: Cannot communicate with Event Manager , 
>End Command output
2022-05-28 04:44:03: SUCCESS:  Successfully stopped the clusterware on local node
2022-05-28 04:44:03: Executing cmd: /opt/oracle/oak/bin/oakcli fstop oak
2022-05-28 04:44:06: Command output:
>  2022-05-28 04:44:03.583081370:[init.oak]:[Stopping oakd]
>  2022-05-28 04:44:06.640504545:[init.oak]:[Successfully stopped the oakd..] , 
>End Command output
2022-05-28 04:49:34: WARNING:  Unable to update the device OVM to:  3.4.4


DOM0 Log :

Dom0 log is trying to obtain a value from running the pgrep opensm command. Opensm services need to be up and running to obtain the value. These logs are useful to get a clear picture of the problem “/var/log/opensm.log” and “/var/log/messages”.


2022-05-28 04:51:02,732 root DEBUG Running: pgrep opensm
2022-05-28 04:51:02,813 root DEBUG Failed to run the cmd: pgrep opensm

Solution

Make sure to backup the “/etc/rc.local” file before making any changes. New parameters “-y” to opensm service.

Use the below mention link to get an idea of the opensm parameters.


-y, --stay_on_fatal

This option will cause SM not to exit on fatal initialization issues: if SM discovers duplicated guides or a 12x link with lane reversal badly configured. By default, the SM will exit on these errors.


-- Before
[root@localhost patch]# cat /etc/rc.local | grep -i opensm
service opensmd stop
opensm -g 0x0010e00001889ad9 -W -p 15 -B
opensm -g 0x0010e00001889ada -W -p 0 -B

-- After 
[root@localhost patch]# cat /etc/rc.local | grep -i opensm
service opensmd stop
opensm -y -g 0x0010e00001889ad9 -W -p 15 -B
opensm -y -g 0x0010e00001889ada -W -p 0 -B


Conclusion

Before the reboot, I strongly recommend you run these commands in both the nodes' terminals before the restart. This helps to validate commands giving any errors.

Expected output :


-- Node01
[root@localhost patch]# opensm -y -g 0x0010e00001889ad9 -W -p 15 -B
-------------------------------------------------
OpenSM 3.3.19
 Reading Cached Option File: /etc/opensm/opensm.conf
-E- Parsing error in field guid, expected numeric input received: 0x0010e00001889ad9 0x0010e00001889ada
 Unrecognized token: "max_seq_redisc"
 Unrecognized token: "rereg_on_guid_migr"
 Unrecognized token: "aguid_inout_notice"
 Unrecognized token: "sm_assign_guid_func"
 Unrecognized token: "reports"
 Unrecognized token: "per_module_logging"
 Unrecognized token: "consolidate_ipv4_mask"
Command Line Arguments:
 Staying on fatal initialization errors
 Guid 0x10e00001889ad9
 Priority = 15
 Daemon mode
 Log File: /var/log/opensm.log
 
--------------------------------------------------------------------------------
--------------------------------------------------------------------------------

[root@localhost patch]# opensm -y -g 0x0010e00001889ada -W -p 0 -B
-------------------------------------------------
OpenSM 3.3.19
 Reading Cached Option File: /etc/opensm/opensm.conf
-E- Parsing error in field guid, expected numeric input received: 0x0010e00001889ad9 0x0010e00001889ada
 Unrecognized token: "max_seq_redisc"
 Unrecognized token: "rereg_on_guid_migr"
 Unrecognized token: "aguid_inout_notice"
 Unrecognized token: "sm_assign_guid_func"
 Unrecognized token: "reports"
 Unrecognized token: "per_module_logging"
 Unrecognized token: "consolidate_ipv4_mask"
Command Line Arguments:
 Staying on fatal initialization errors
 Guid 0x10e00001889ada
 Priority = 0
 Daemon mode
 Log File: /var/log/opensm.log
-------------------------------------------------
[root@pinode0 patch]#


Stay Secure Without Stopping: Leveraging Oracle TAC and Rolling Patching in the AI-Driven Era

  Intro We live in an era where businesses are powered by data, running their most critical systems on robust platforms like Ora...